Configure Server USB Devices
You can configure server-side USB devices (radios, rotators, etc.) in the 'SETUP' view.
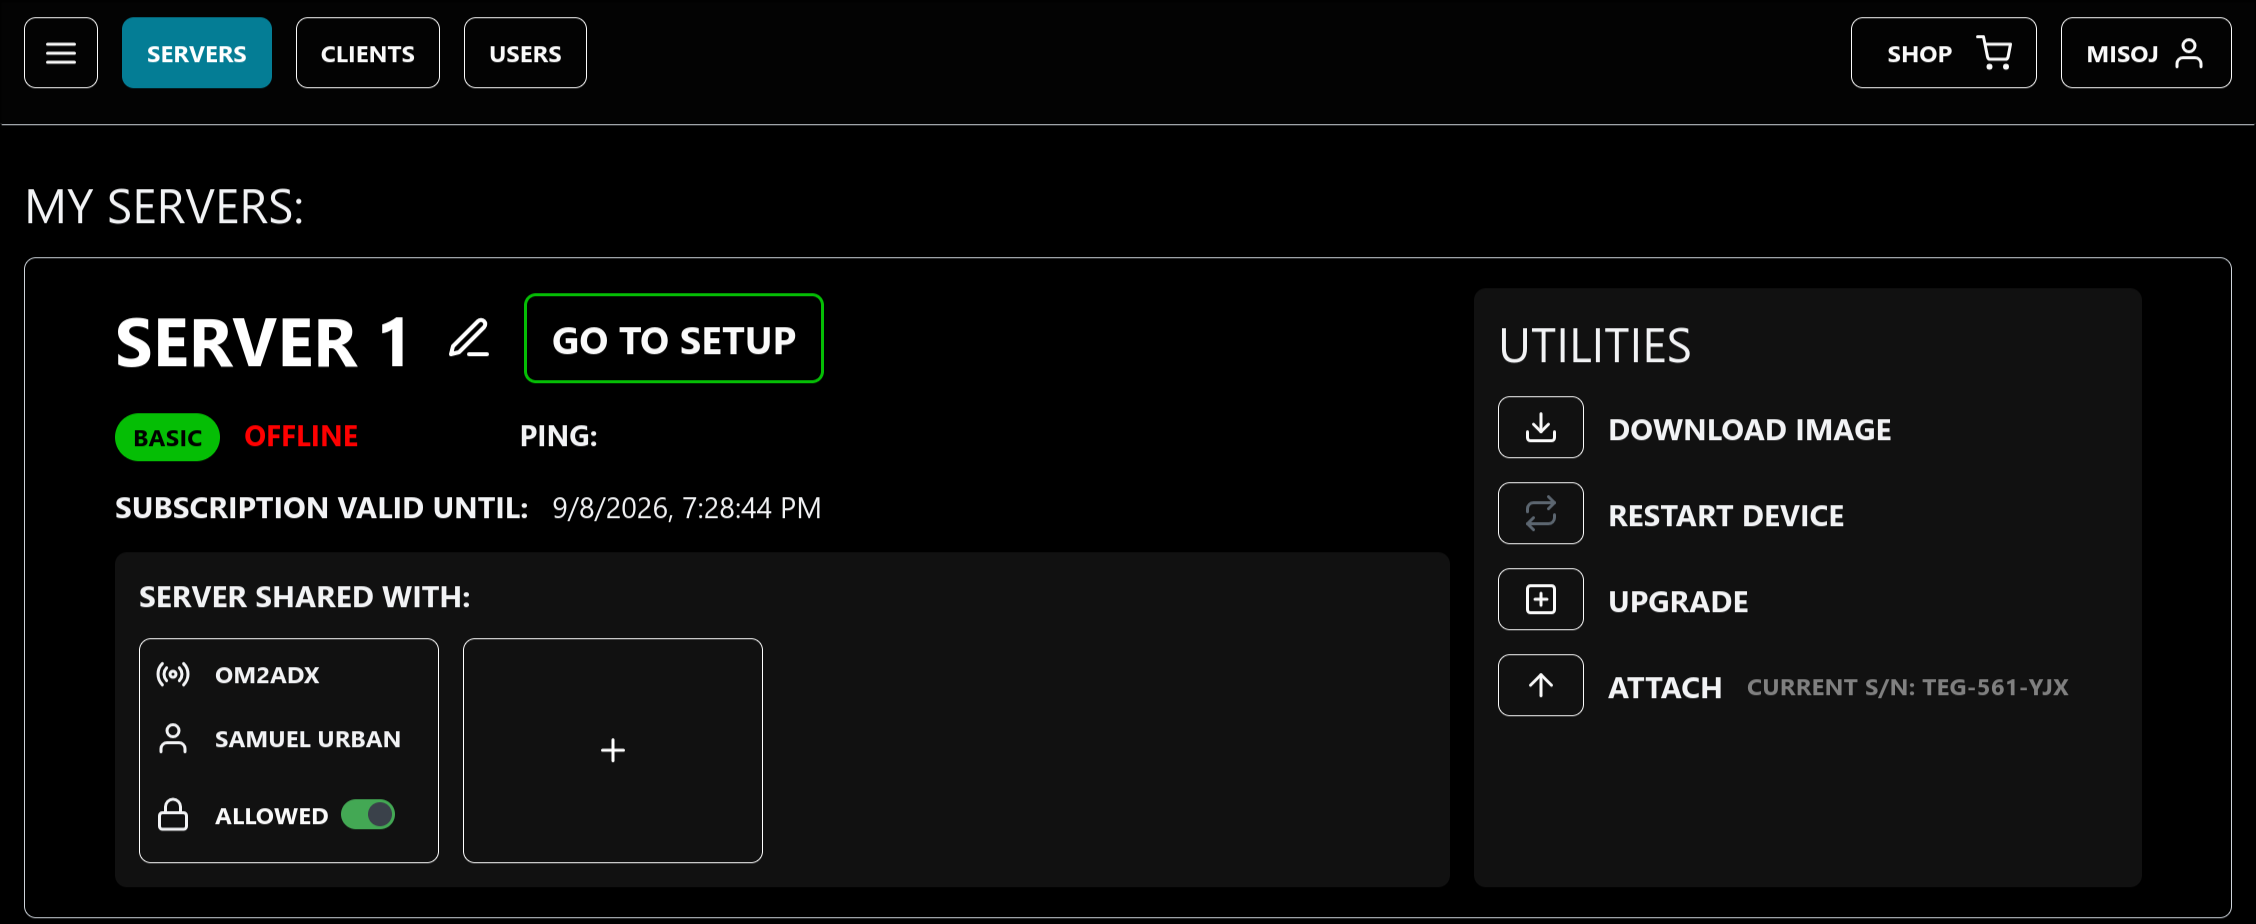
You access SETUP by clicking the 'GO TO SETUP' button next to your server in the 'SERVERS' view, or by clicking the navigation button in the top-left corner and selecting 'SETUP' (the server must be ONLINE - see hardware).
On first-time access, a tutorial will launch, which will guide you through configuring a USB radio; by the end of the tutorial, you should be receiving audio from your radio in the browser.
Add a USB radio
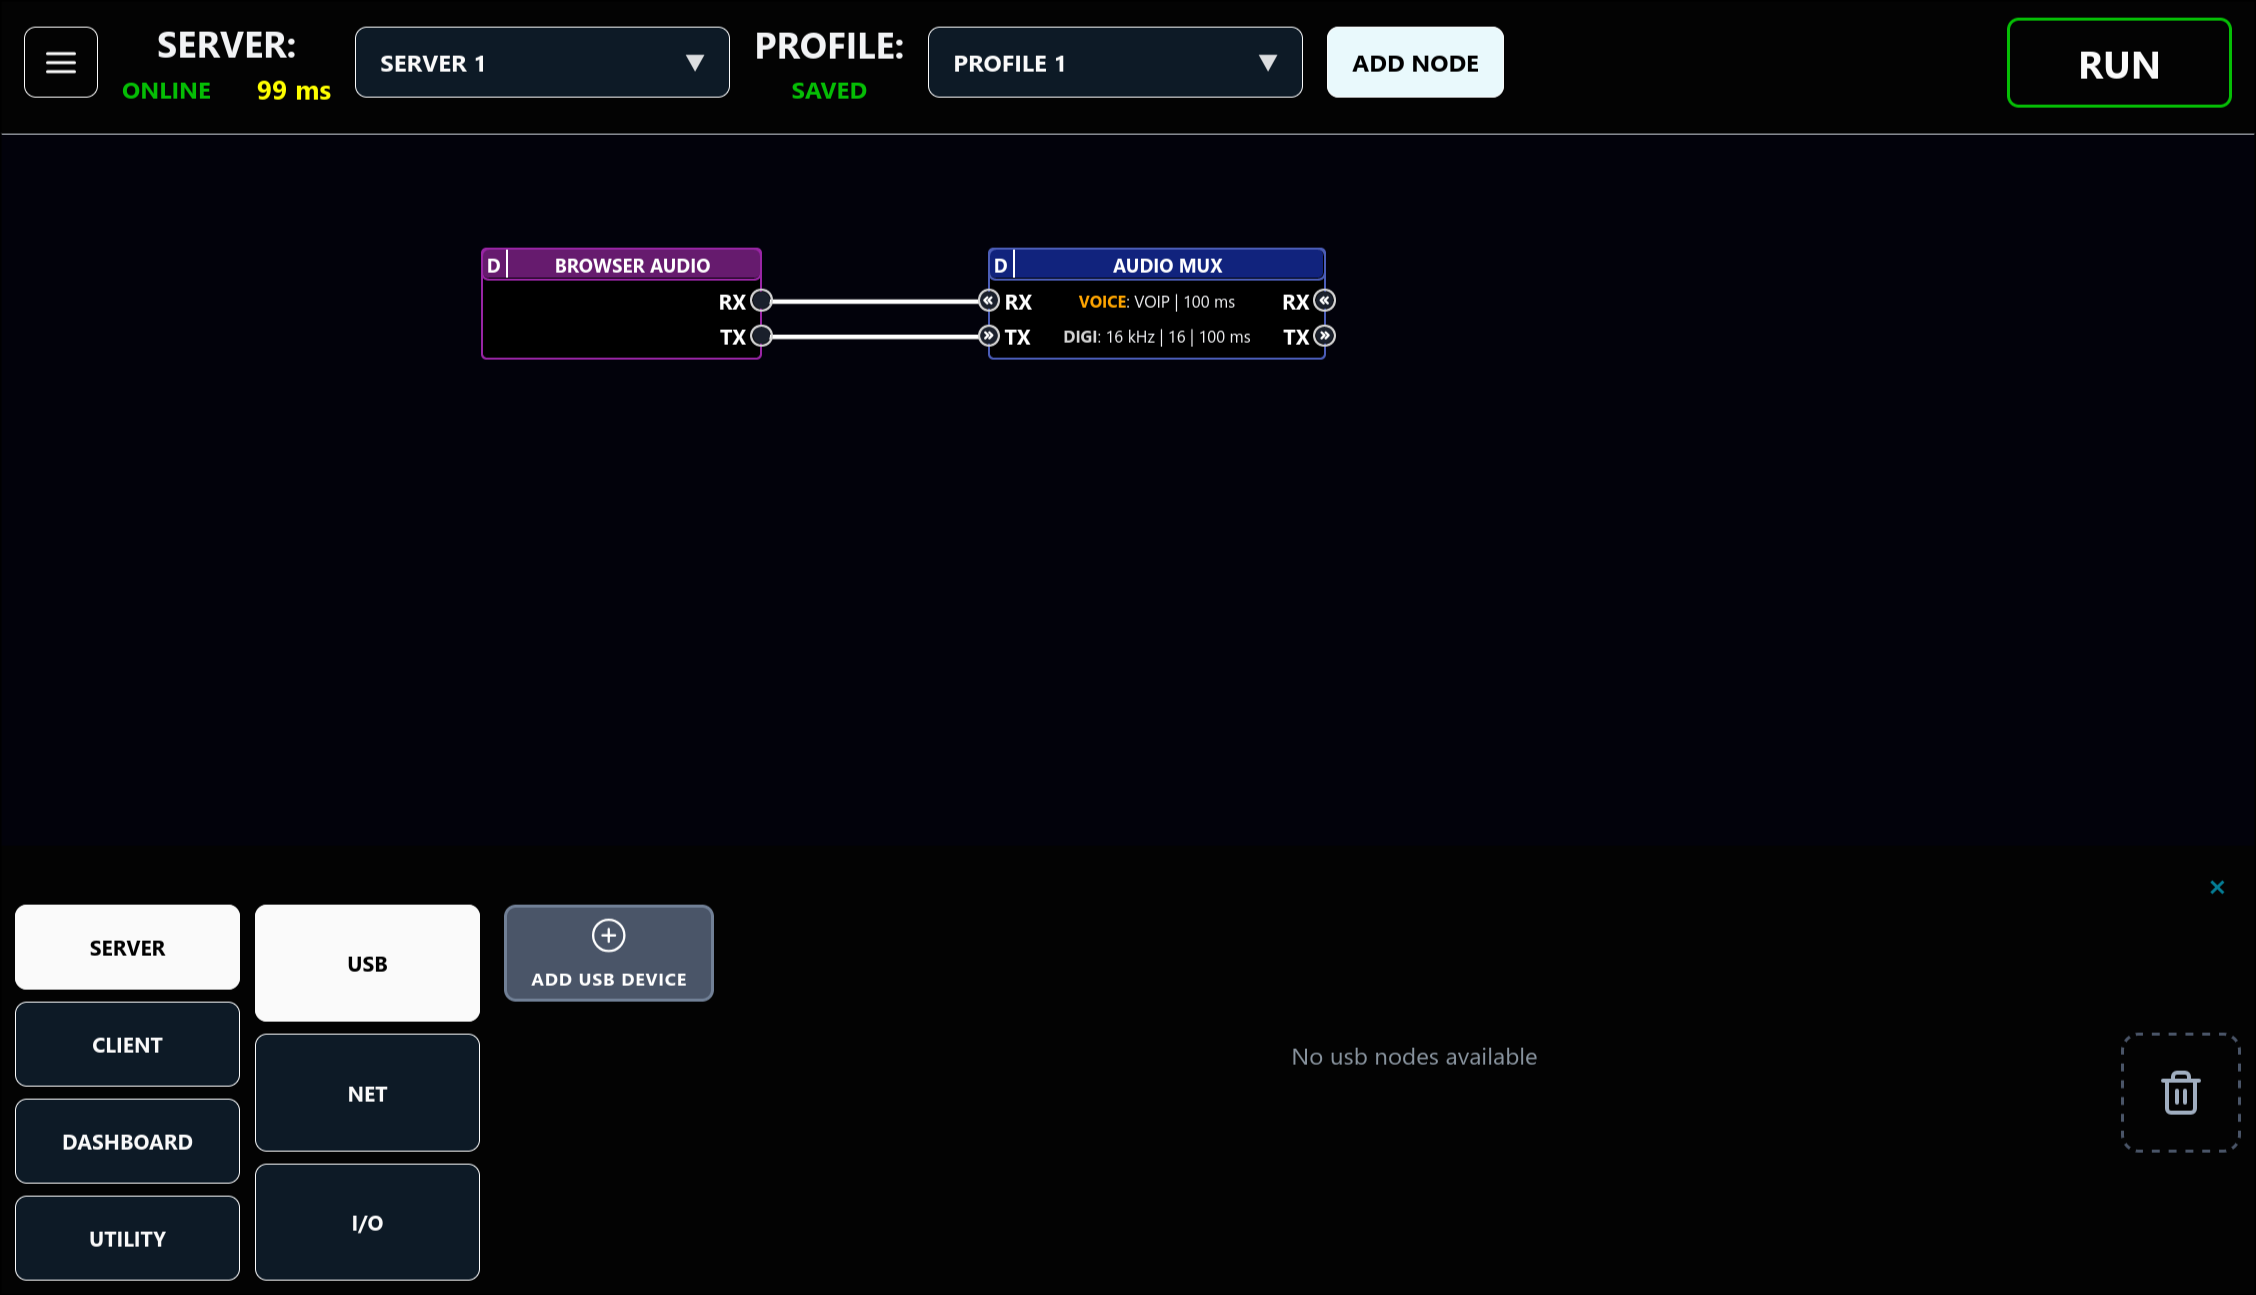
Click the 'ADD NODE' button in the header bar.

In the panel that appears in the bottom of the screen, click 'ADD USB DEVICE' (SERVER -> USB must be selected).
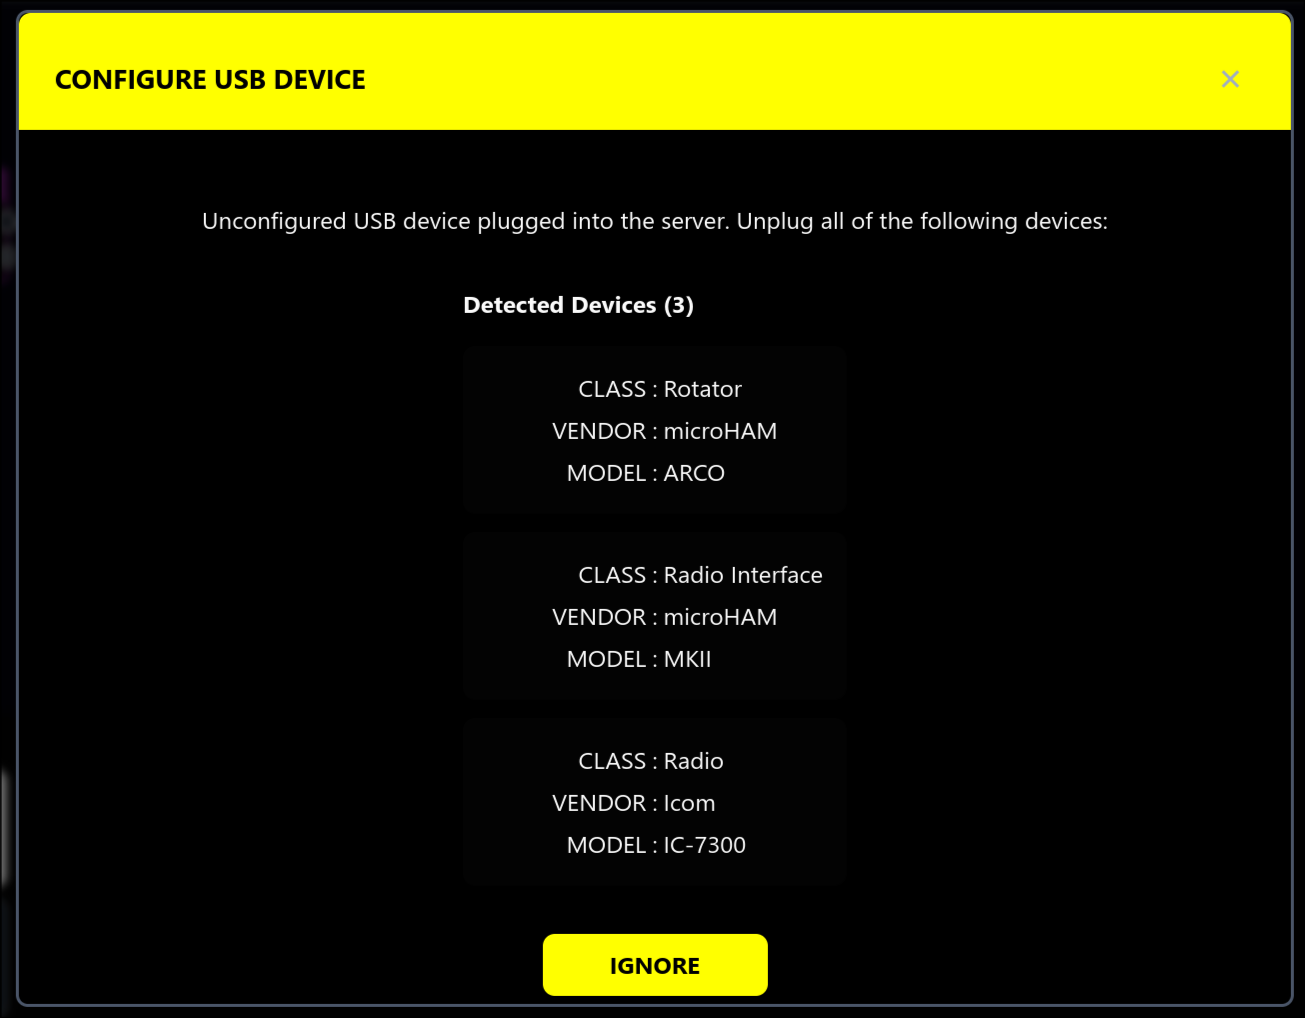
A dialog will appear. If you have already plugged a device into the server's USB port, it will appear listed with a prompt to disconnect it before proceeding. If this happens to you, you can click on the device to proceed configuring it without having to disconnect it. However, it is recommended to disconnect the device and replug it when prompted. This is especially if you are configuring multiple devices at a time, to prevent miss-labeling a device as something else. You can also hit the ignore button, but then you cannot add the devices listed until you unplug and replug them.
Otherwise (or after unplugging / hitting ignore), you will see a spinner and an instruction to plug in your USB device now. It is highly recommended to plug in your USB devices one at a time to ensure correct configuration.
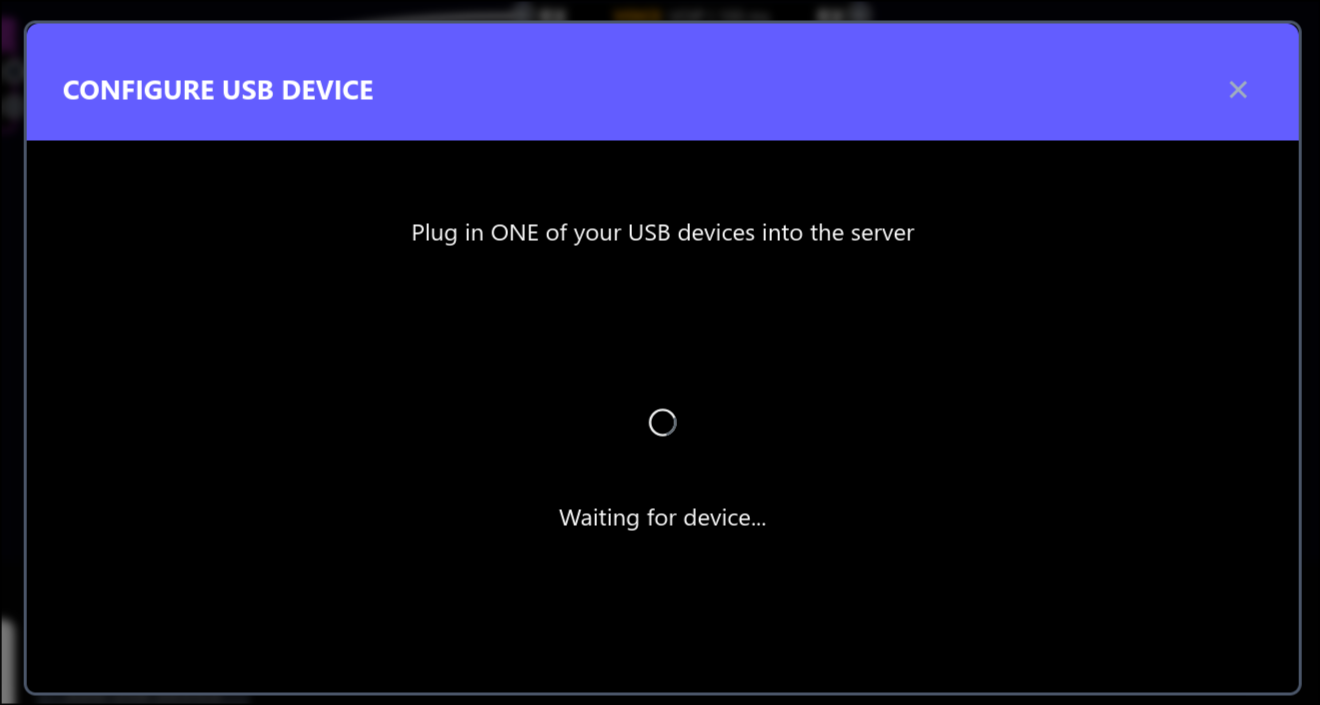
Plug in your device into one of the server's USB ports. To allow connecting more devices then there are built-in USB ports on your server device, you can also plug in a USB hub now. When plugging-in a USB hub, make sure it is initially empty. Let the application scan it, then hit the confirmation button once a prompt appears that an empty USB hub was detected, before proceeding with adding more devices. Please check that any USB hub that you connect has enough bandwidth for the devices connected to it. In particular, audio devices (e.g. radios) require a lot of USB bandwidth, and we recommend plugging them directly into the server, especially if you encounter issues with them.
After plugging-in your device, a loading bar may appear while the application scans and attempts to recognize your device. Some devices are automatically recognized by the application, and we are continually adding more. If the device was automatically recognized, you will see a screen showing information about the device. Otherwise, you will prompted to enter the following, in order: device category, vendor, and product. If you do not see your device in the list provided, please contact us via email or forum with information about the device, and our team will try our best to add it to the list. We are constantly adding support for more devices!
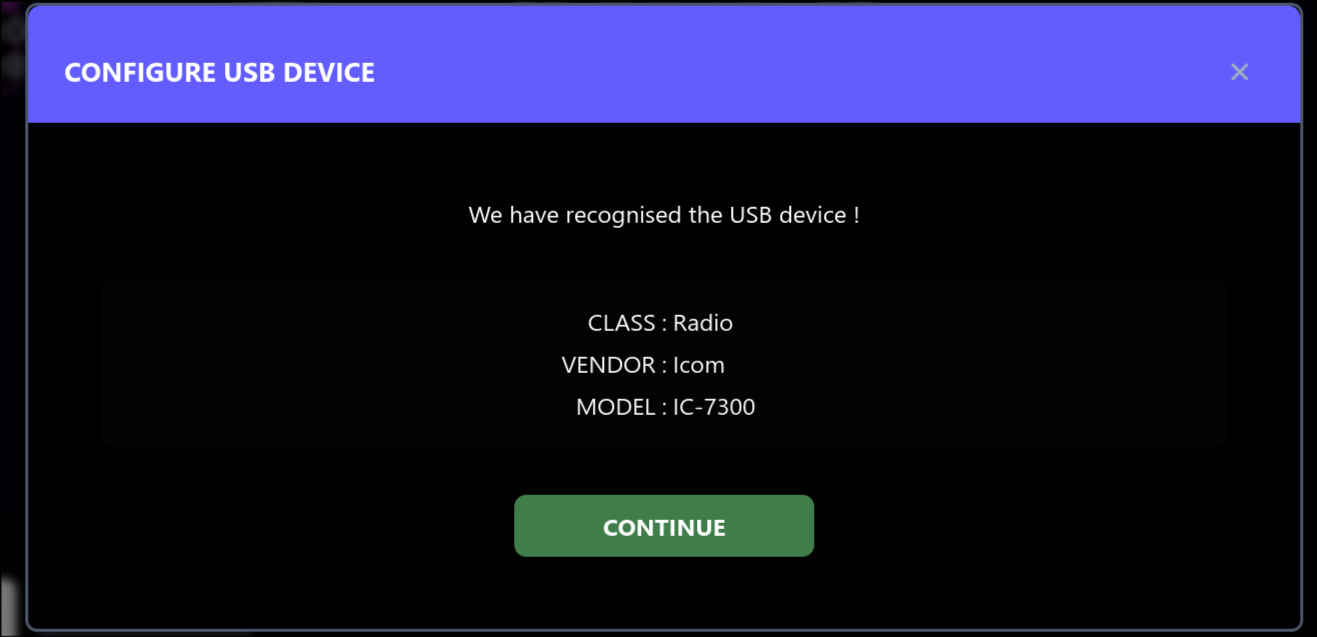
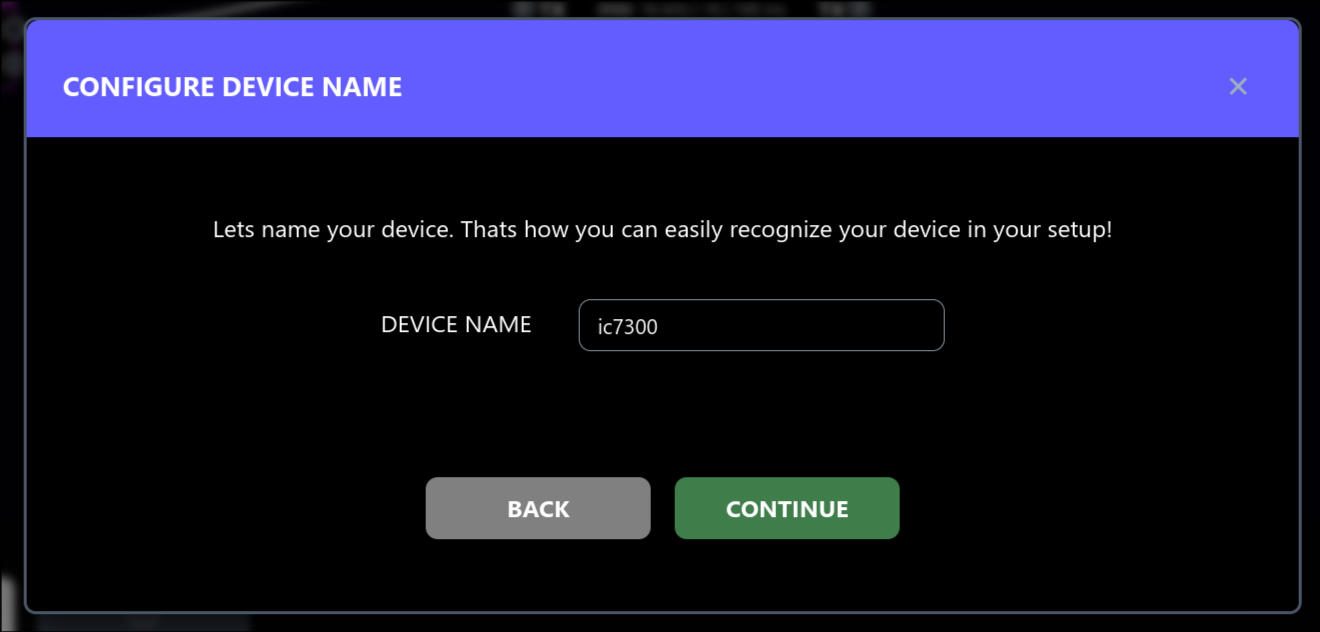
After your device was recognized or you selected a model manually, you will be prompted to enter a name for the device. The name must be at least 3 characters long. Hit confirm once you set the name you like. You can change the name later by clicking the device in the SETUP view.
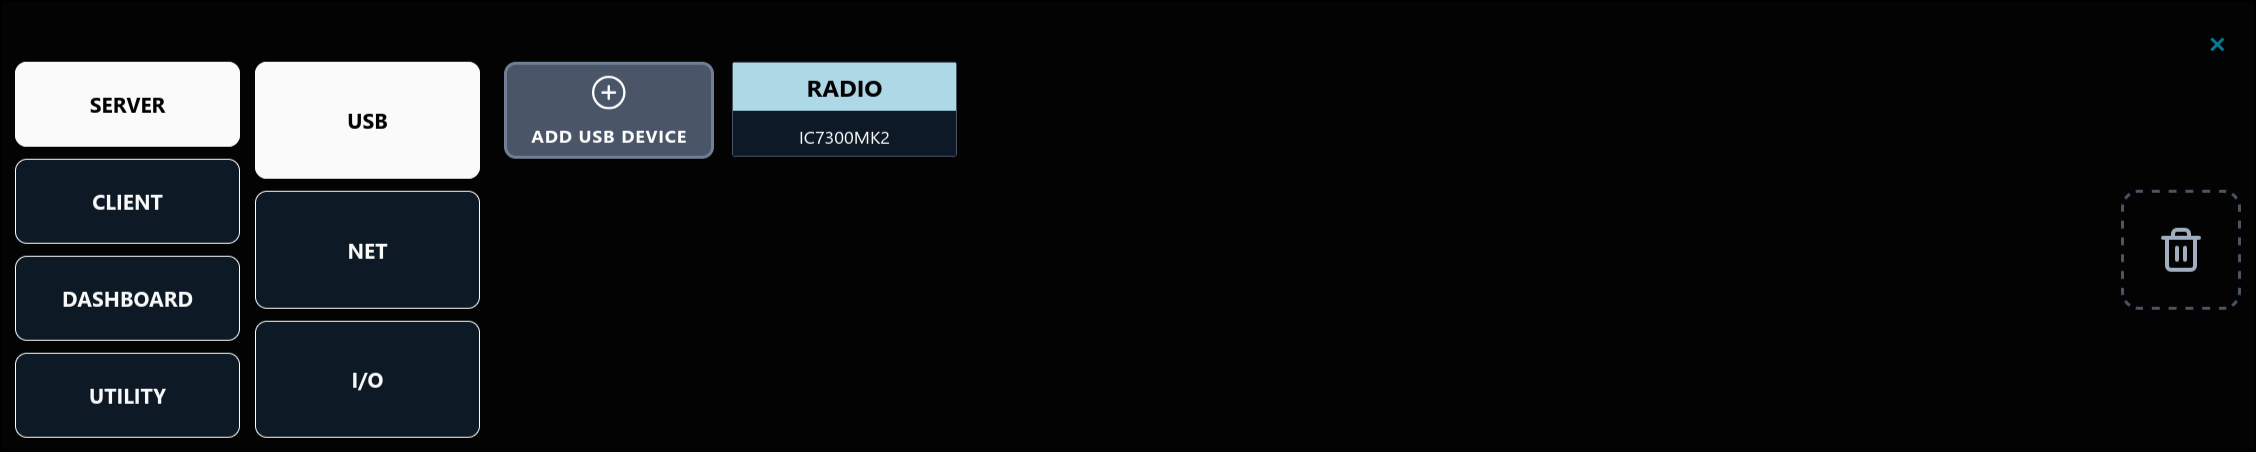
The newly added device will appear under the configured name in the SERVER -> USB section of the 'ADD NODE' panel.
To remove the configured device, drag it into the thrash can icon on the right. You will then be able to configure it again via 'ADD USB DEVICE'.
Drag the device into the canvas above the panel to start connecting it to dashboard controllers and other resources.
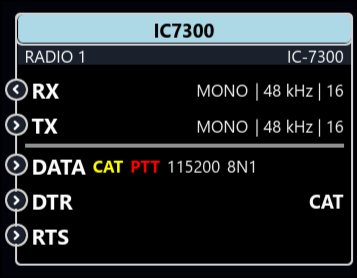
To start listening and transmitting with your radio from the browser, add a 'BROWSER AUDIO' and an 'AUDIO MUX' node (DASHBOARD section of the ADD NODE panel), and connect it to the radio's RX and TX ports as shown. To be able to control your radio, add a 'RADIO' dashboard controller node and connect it to your radio's CAT (DATA) port. Please note that the set of devices currently supported by the RADIO dashboard controller is limited, but we are constantly working on expanding it, and you can let us know what devices you want us to support next via mail or forum. If your radio is not yet on the dashboard controller support list, you can instead connect its CAT port to a client serial port and control it with an external app. You can combine access via the RADIO dashboard controller and one or more external apps via serial ports by joining them via the 'MERGE CAT PORTS' utility node (UTILITY section of the ADD NODE panel). For Icom radios in such a multi-controller setup, please make sure every controller (dashboard or external app) is using a different CI-V address, otherwise functionality will break down. You can change the host CI-V address used by the RADIO controller by clicking the controller in the SETUP view and editing the address in the bottom panel.

You can edit your device's config by clicking it in the SETUP view canvas. A configuration panel will appear in the bottom of the screen. You can change the name of your device by clicking the pencil icon next to the device name in the top-left of the panel. The configuration itself is split into multiple tabs.
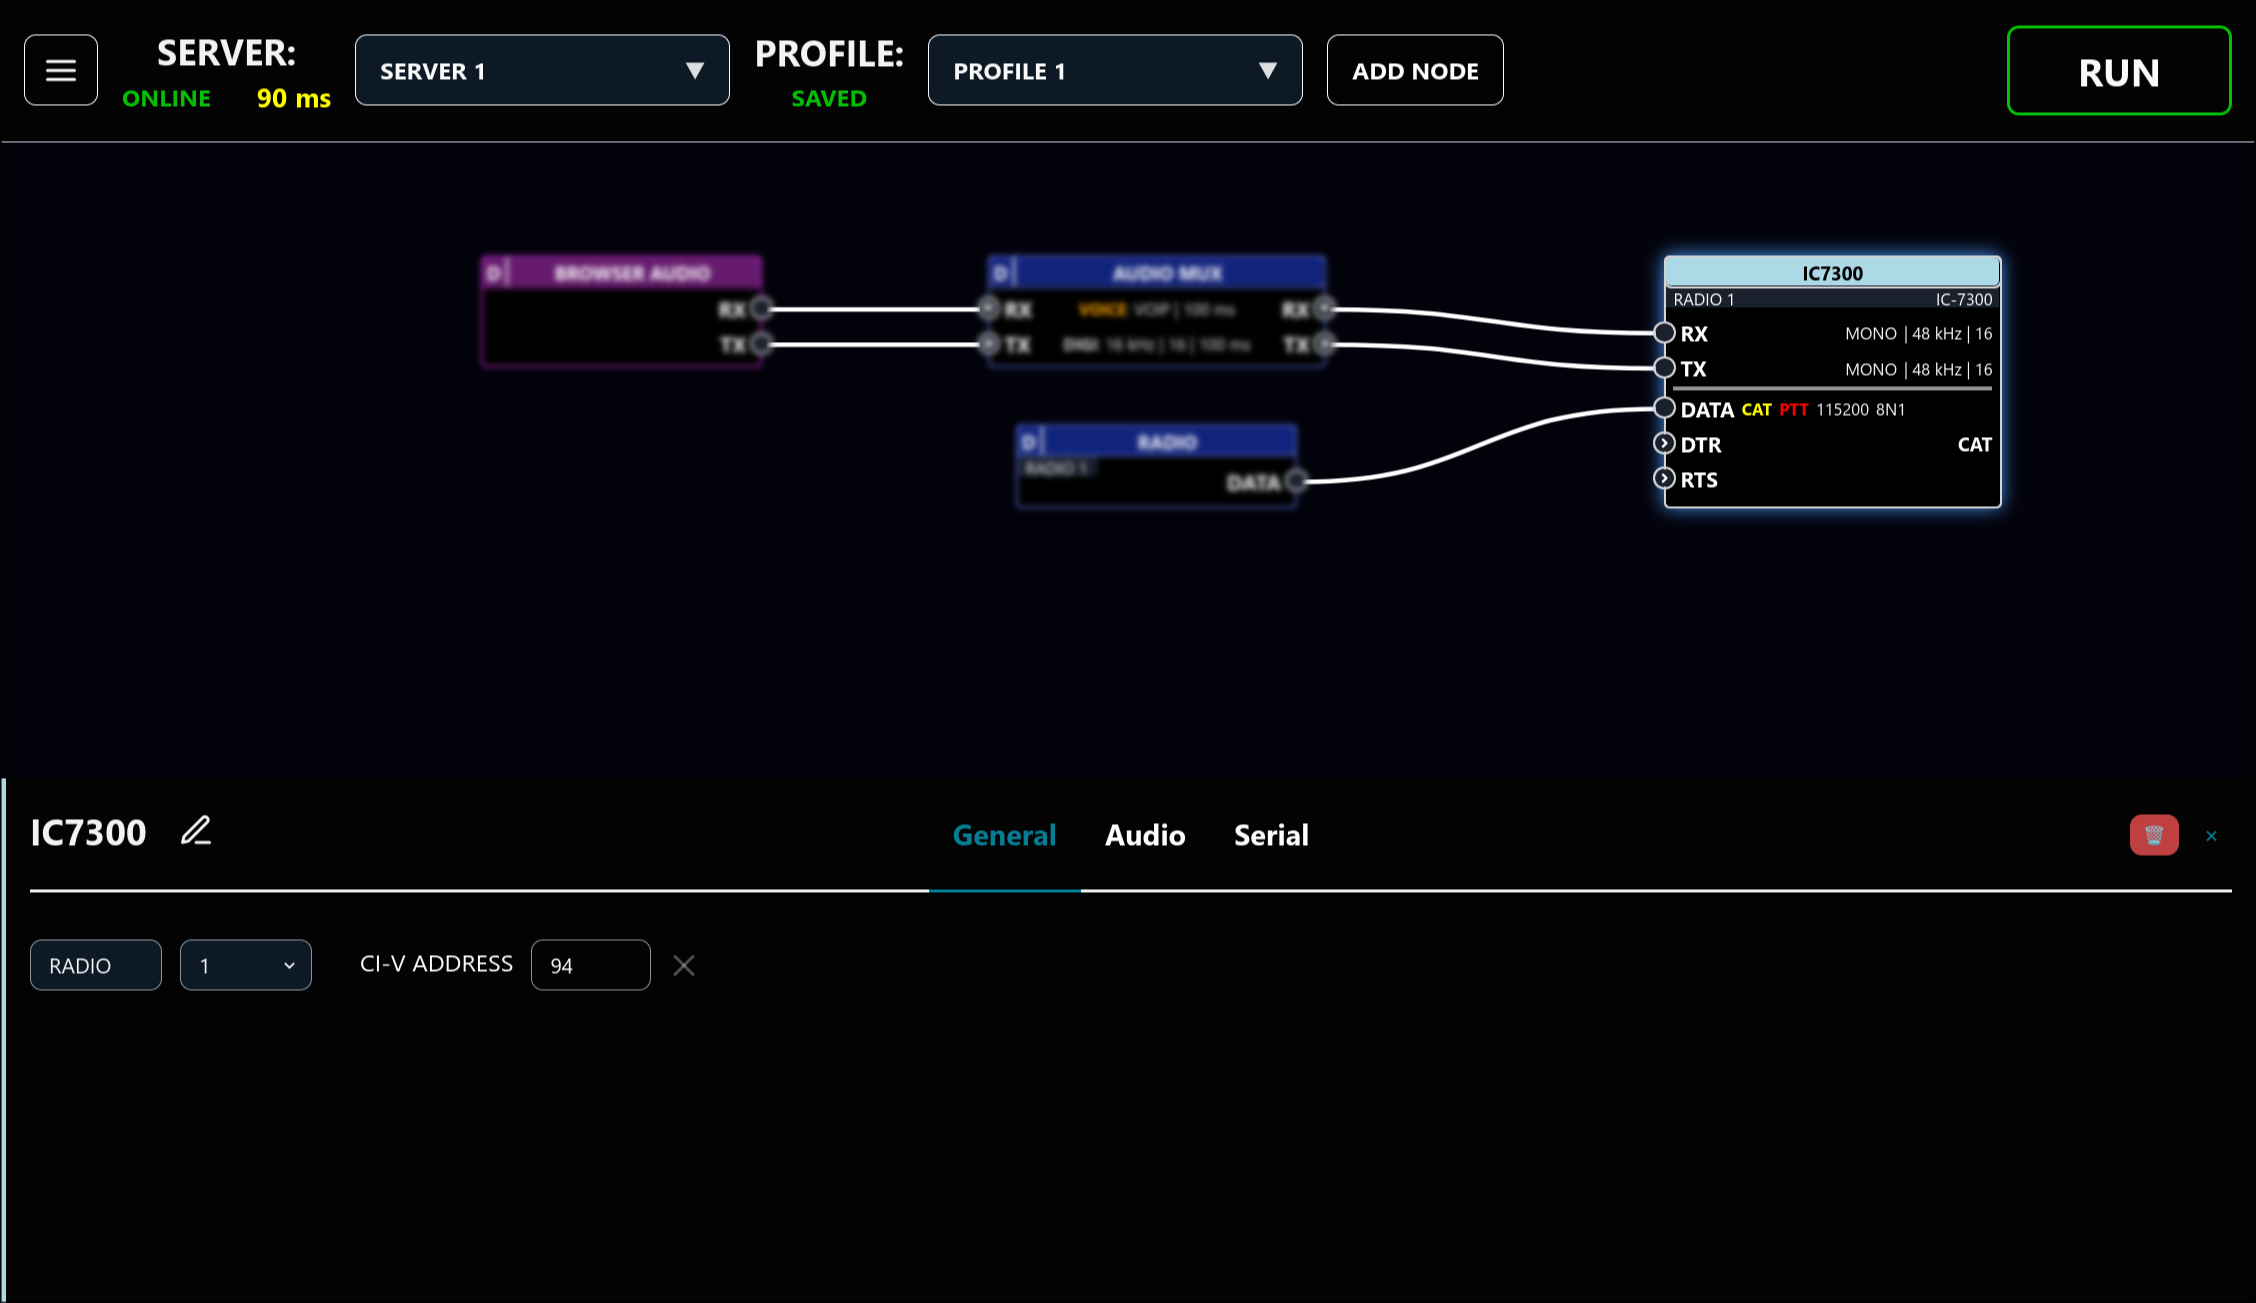
In the GENERAL tab, you can change the auto-assigned device number (e.g. RADIO 1). The device number allows you to bind controller functions to hardware controls (e.g. MIDI controllers) and have these bindings be portable across servers (so a binding to the main frequency made for RADIO 1 will refer to the same function on your friend's RADIO 1 when you visit his server).
For Icom radios, you can also change the radio's CI-V address from the model default. Please ensure this address matches the address configured in the radio, otherwise the RADIO controller and CAT PTT functionality will not work.
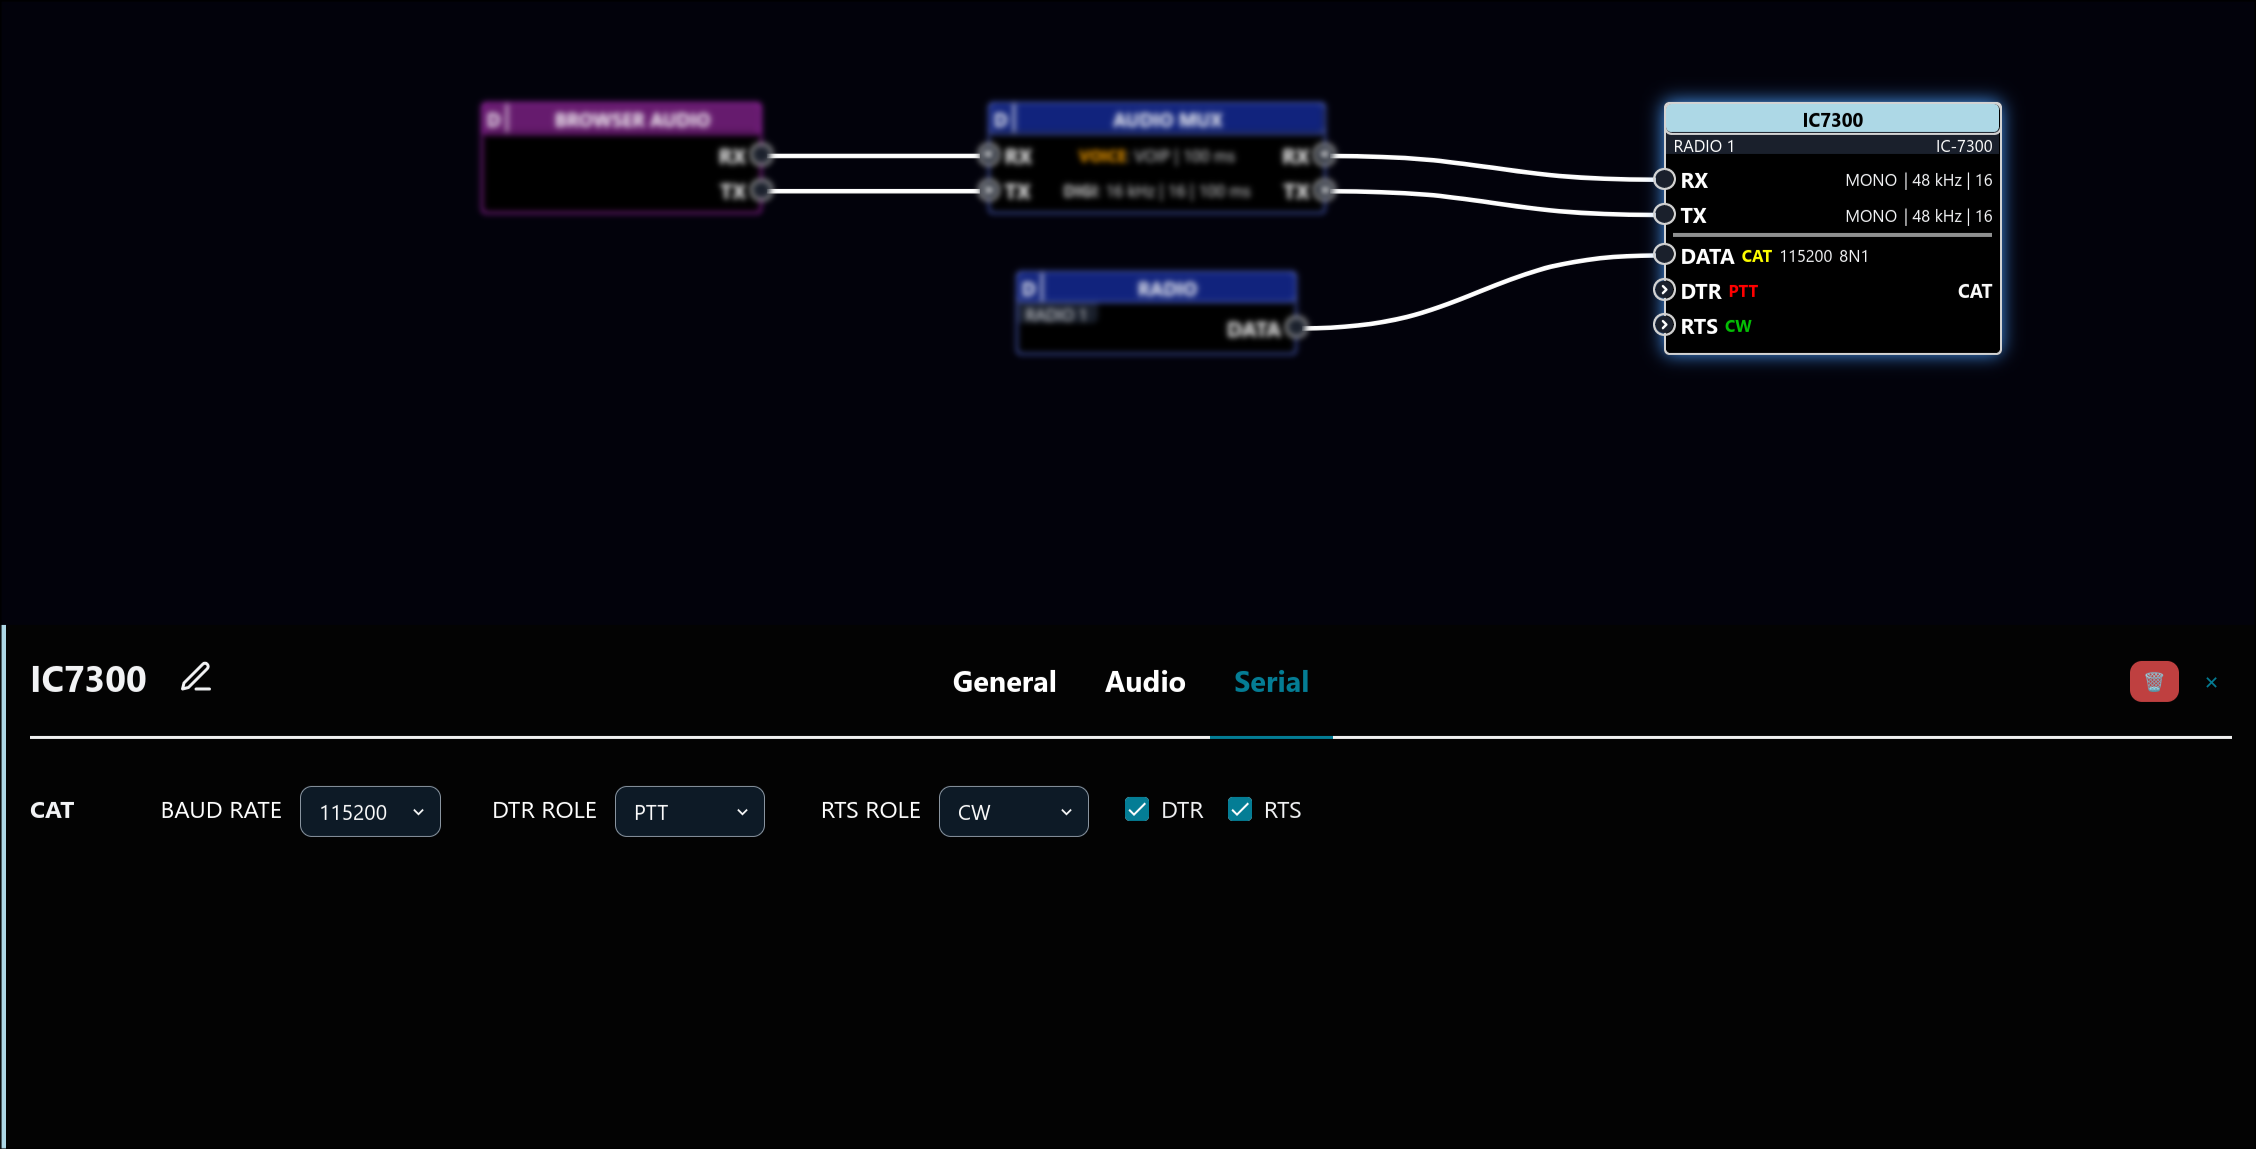
In the serial tab, you can configure the serial port baud rate, parity and stop bits. Please make sure this matches the physical configuration in the device, otherwise communication with the device will not work. For some devices with multiple serial ports, you can also select which serial port is used for CAT data (if you do not see this option, this means this role is static for your device).
For radios, the CAT port is used to send PTT (TX ON / OFF) signaling by default. For most usage scenarios, we recommend you enable PTT through the DTR or RTS signal. This is done by setting the DTR ROLE / RTS ROLE field in the SERIAL configuration tab to PTT. You can also set the DTR / RTS ROLE field to CW, to use the port to send CW signals. Please make sure the DTR / RTS ROLE matches the physical configuration in your device (for Icom radios with RADIO controller support, we set this configuration in the radio automatically to match what is selected here when you hit 'RUN', as long as you have a 'RADIO' controller connected to the CAT DATA port).